As a parent, finding activities that are both fun and educational for our kids can sometimes feel like searching for a needle in a haystack. But guess what? One of the best activities is probably sitting in your recycling bin right now: paper! Yes, good old paper – from colorful origami sheets to yesterday’s newspaper – can become the source of hours of fun. In this blog post, we’ll explore some easy and exciting paper crafts that you and your little ones can enjoy together. These aren’t just entertaining; they’re also great for developing fine motor skills, encouraging creativity, and, best of all, they use materials you likely already have at home. So, let’s dive into the world of paper crafts and unleash the creative potential in your kiddos!
Origami for Beginners
Origami, the ancient art of paper folding, is not just an artistic expression but a fun way to challenge the dexterity and creativity of your little ones. Don’t worry if you’re not a ‘crafty’ parent; origami starts simple. You can create everything from boats to animals with just a few folds. Let’s start with a classic – the paper boat. This project is great for beginners and a hit during bath time!
Simple Paper Boat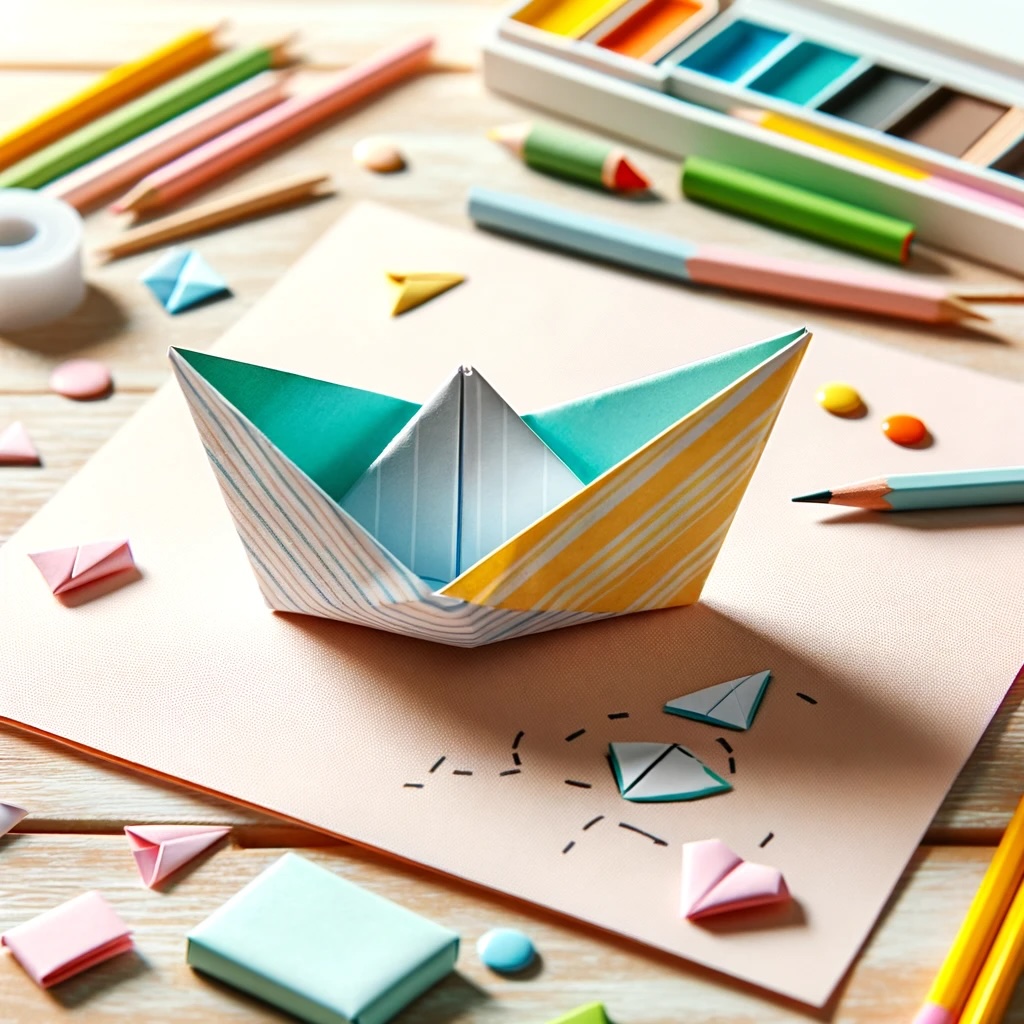
Materials Needed:
- A sheet of paper (A4 or letter size)
Steps:
- Fold your paper in half, bringing the shorter sides together.
- Fold it in half again to mark the center, then unfold back to the previous step.
- Fold the top corners down to the middle crease, forming a triangle at the top.
- Fold the bottom of the paper up on both sides, creating a hat shape.
- Open up the hat from the bottom and flatten it into a square.
- Fold the bottom flaps up on both sides of the square, creating a narrower diamond shape.
- Again, open from the bottom and flatten to get a triangle.
- Gently pull the two layers apart at the top, and voila! Your paper boat is ready to sail.
This craft is not only fun but also a subtle lesson in geometry. Once your child masters the boat, encourage them to experiment with different sizes and colors of paper. Who says you can’t have a whole fleet of paper boats?
Creative Paper Mache Projects
Paper mache is like the magic of the craft world. With just some paper and a simple paste, your kids can mold almost anything they can imagine. It’s a bit messier than origami, but that’s part of the fun!
Basic Paper Mache Paste Recipe
Materials Needed:
- 1 part flour to 2 parts water (e.g., 1 cup flour, 2 cups water)
- A large bowl for mixing
- Strips of newspaper or any thin paper
Steps:
- Mix the flour and water in the bowl until it forms a smooth paste.
- Dip the paper strips into the paste, making sure they’re well coated.
- Apply the strips to your chosen mold or form, layering them until you get the desired thickness.
- Let it dry completely, which can take up to 24 hours.
Easy Paper Mache Bowl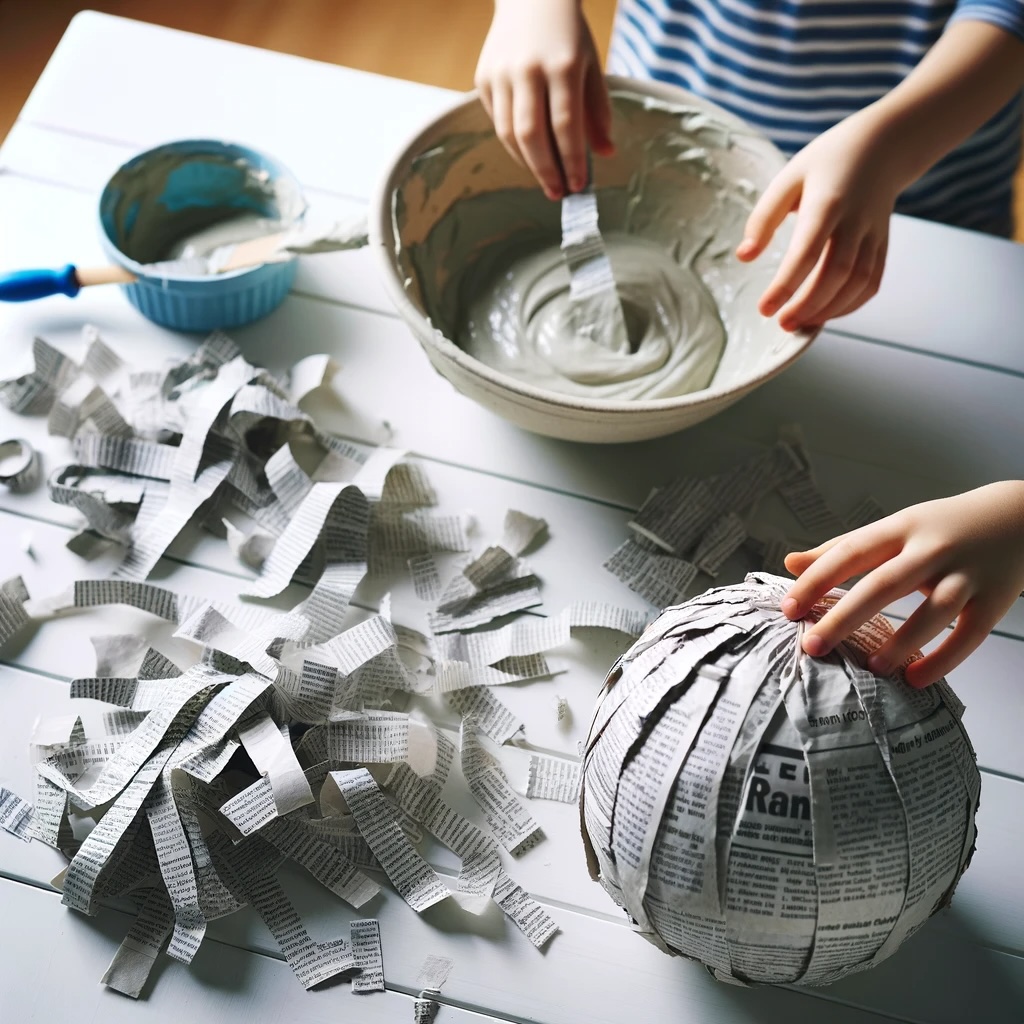
This is a great starter project for paper mache. Use a bowl as a mold to create a simple yet beautiful paper mache bowl.
Materials Needed:
- Basic paper mache paste
- Balloon
- Paint and decorations (optional)
Steps:
- Inflate a balloon and rest it, tied side down, in a bowl.
- Apply the paste-coated paper strips over the top half of the balloon.
- Once you’ve covered it with a few layers, let it dry completely.
- Pop the balloon and gently remove it.
- You can paint or decorate the bowl as you like.
This project not only teaches the basics of paper mache but also gives your child a sense of accomplishment by creating something functional and artistic. They can use their bowls to store trinkets or as a decorative piece in their room.
Fun with Paper Plates
Believe it or not, the humble paper plate is a crafting gold mine. They’re sturdy, easily paintable, and perfect for a multitude of projects. Let’s create something that kids will love – a paper plate animal mask. It’s a wonderful activity for pretend play or themed parties.
Paper Plate Animal Mask
Materials Needed:
- Paper plates
- Paints and brushes
- Scissors
- Glue
- Elastic string
- Additional decorations (like feathers, sequins, etc.)
Steps:
- Choose Your Animal: Let your child pick their favorite animal. It could be anything from a lion to a butterfly.
- Paint the Plate: Paint the paper plate to match the chosen animal. This is where kids can get creative with colors.
- Cut Out the Features: Depending on the animal, cut out eye holes and any additional features (like ears or a snout).
- Decorate: Glue on any extra decorations – feathers for a bird, a yarn mane for a lion, etc.
- Add the String: Make small holes on either side of the plate. Tie elastic string to them for a wearable mask.
This craft is fantastic for developing fine motor skills and allows for a lot of creativity. Plus, it’s a blast for kids to play with their creations after they’re done!
Crafting with Recycled Paper
Recycling doesn’t have to be dull! It’s a wonderful way to teach kids about sustainability while being creative. Old newspapers, magazines, and even junk mail can be transformed into amazing crafts. Let’s make something both eco-friendly and beautiful.
Newspaper Collage
Materials Needed:
- Old newspapers or magazines
- A large sheet of paper or cardboard as the base
- Glue
- Scissors
- Optional: Paints or markers
Steps:
- Theme Selection: Decide on a theme for your collage. It could be anything from a landscape to an abstract mix of colors and patterns.
- Cut and Tear: Have your kids cut or tear the newspapers and magazines into various shapes and sizes.
- Arrange and Glue: Let them arrange the pieces on the base paper. Once they’re happy with their layout, glue the pieces down.
- Add Details: Use paints or markers to add extra details or to blend the collage into a cohesive artwork.
This activity is not only a creative outlet but also a great conversation starter about recycling and reusing materials. It’s amazing what kind of artwork you can create with what would otherwise be thrown away.
Paper Bead Jewelry
Turn old magazines into colorful beads for jewelry-making. This is a bit more intricate, perfect for older kids.
Materials Needed:
- Magazine pages
- Skewers or toothpicks
- Glue
- String or yarn for threading beads
Steps:
- Cut the magazine pages into long, thin triangles.
- Starting at the wide end, roll each triangle tightly around a skewer.
- When you reach the tip, secure it with a bit of glue.
- Slide the bead off and let it dry.
- Thread the beads onto string or yarn to make necklaces or bracelets.
This craft is great for teaching patience and precision, and the end result is something kids can wear and show off to friends and family.
Conclusion
And there you have it – a world of creativity at your fingertips with nothing more than some paper, a few household items, and a sprinkle of imagination. Each of these projects is a doorway to a magical world for your kids, where they learn, create, and play. Remember, there’s no right or wrong in crafting. It’s all about the fun and the experience.
As you embark on these paper craft adventures with your children, remember to embrace the mess, cherish the imperfections, and celebrate their creative efforts. Who knows? You might just awaken a lifelong passion or, at the very least, create some beautiful memories together. So, grab that stack of old newspapers, fish out some paper plates, and let the crafting begin!