In a world where screens often dominate playtime, nature-inspired crafts offer a refreshing change. They’re not just about creating something beautiful; they’re about connecting our children with the natural world. Using materials like leaves, twigs, stones, and flowers, these crafts encourage kids to explore and appreciate the outdoors, even when they’re inside. This blog post will guide you through some simple yet enchanting craft projects that you and your little explorers can enjoy together. From leaf printing to rock painting, each activity is an opportunity to engage with nature’s wonders and ignite creativity. So, let’s embark on this crafting journey and discover the art that nature has to offer!
Leaf Printing Art
Imagine turning a simple leaf into a stunning piece of art. Leaf printing is a fantastic way to do just that. It’s not only incredibly fun but also an excellent way for kids to learn about different leaf shapes and textures.
What You’ll Need:
- A variety of leaves (different shapes and sizes)
- Paint (watercolors or acrylics work well)
- Brushes or sponges
- Paper or fabric to print on
Steps to Create Your Leaf Prints:
- Leaf Hunt: Start with a nature walk to collect leaves. Look for leaves with pronounced veins and interesting shapes.
- Paint Preparation: Lay out your leaves and paints. If you’re using fabric, remember to place a protective layer underneath.
- Paint the Leaf: Apply a thin layer of paint on the vein side of the leaf. Encourage kids to experiment with colors.
- Make the Print: Carefully press the painted leaf onto your paper or fabric. Use a roller or your hands to apply even pressure.
- Peel and Reveal: Gently peel the leaf back to reveal the print. Let it dry completely.
These prints can be framed, used as homemade cards, or even as fabric prints for cushion covers. It’s a beautiful way to bring a piece of the outdoors into your home and a great conversation starter about the diversity of nature.
Rock Painting Fun
Rock painting is a versatile craft that delights kids of all ages. Whether it’s creating a cute animal or a colorful abstract design, painting on rocks offers a unique canvas for creativity. Plus, it’s a perfect excuse to go on a rock-hunting adventure outdoors!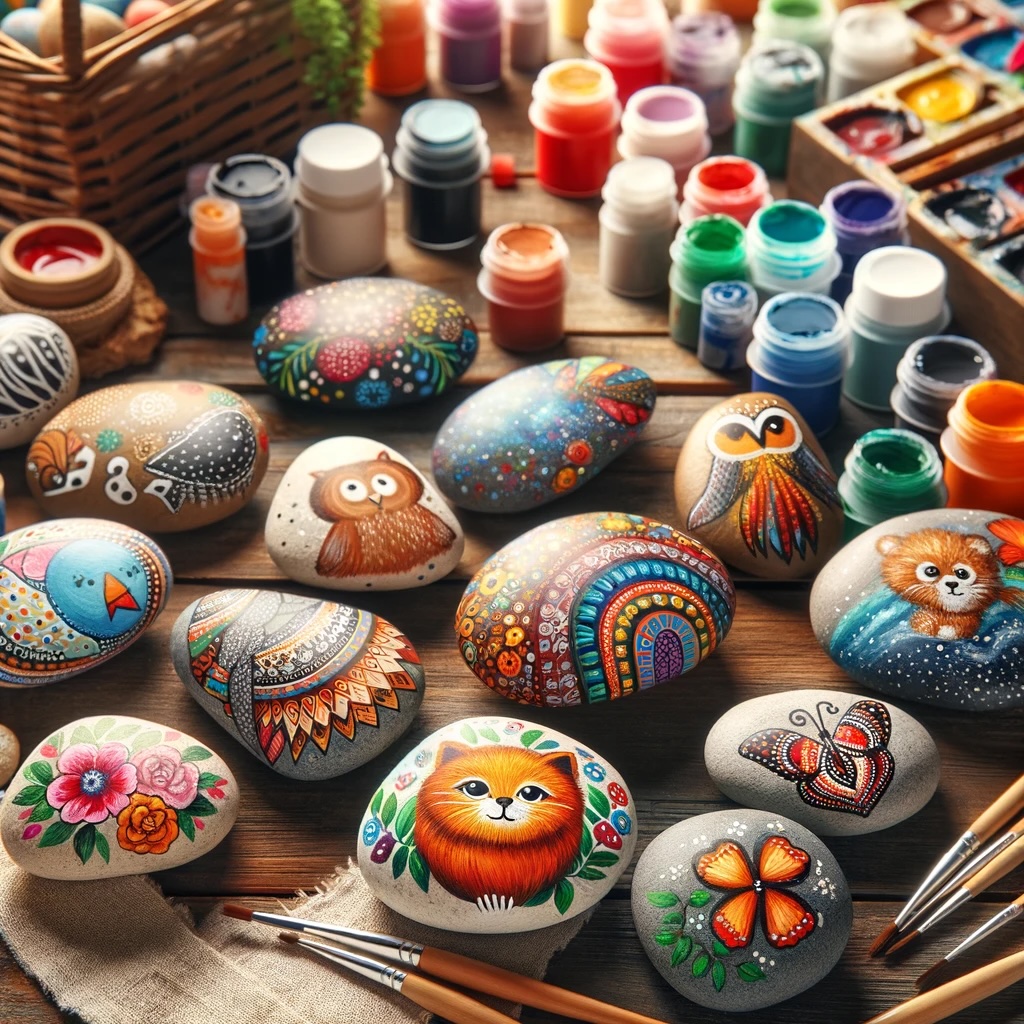
What You’ll Need:
- Smooth rocks or stones
- Acrylic paints
- Brushes of various sizes
- A clear sealant (optional, for outdoor use)
Steps to Paint Your Rocks:
- Rock Hunt: Start by finding smooth, flat rocks. The smoother the surface, the easier it will be to paint on.
- Clean the Rocks: Wash the rocks and let them dry completely. This ensures the paint adheres well.
- Plan Your Design: Encourage your kids to brainstorm ideas. They can draw their designs on paper first.
- Painting Time: Start painting! Thin brushes are great for details, while thicker ones are good for filling in larger areas.
- Sealing the Deal: Once the paint is dry, you can apply a clear sealant to protect the artwork, especially if the rocks will be kept outside.
These painted rocks can brighten up a garden, serve as paperweights, or even be part of a hide-and-seek game in your community. It’s a great way to inspire creativity and a love for the little wonders of the earth.
Twig Frame Creations
There’s something special about incorporating elements of nature into our homes, and twig frames are a perfect example of this. Creating a twig frame is not just a craft; it’s a way to capture memories in a natural, rustic setting. Plus, it’s a fantastic project to work on with your kids, from collecting twigs to assembling the frame.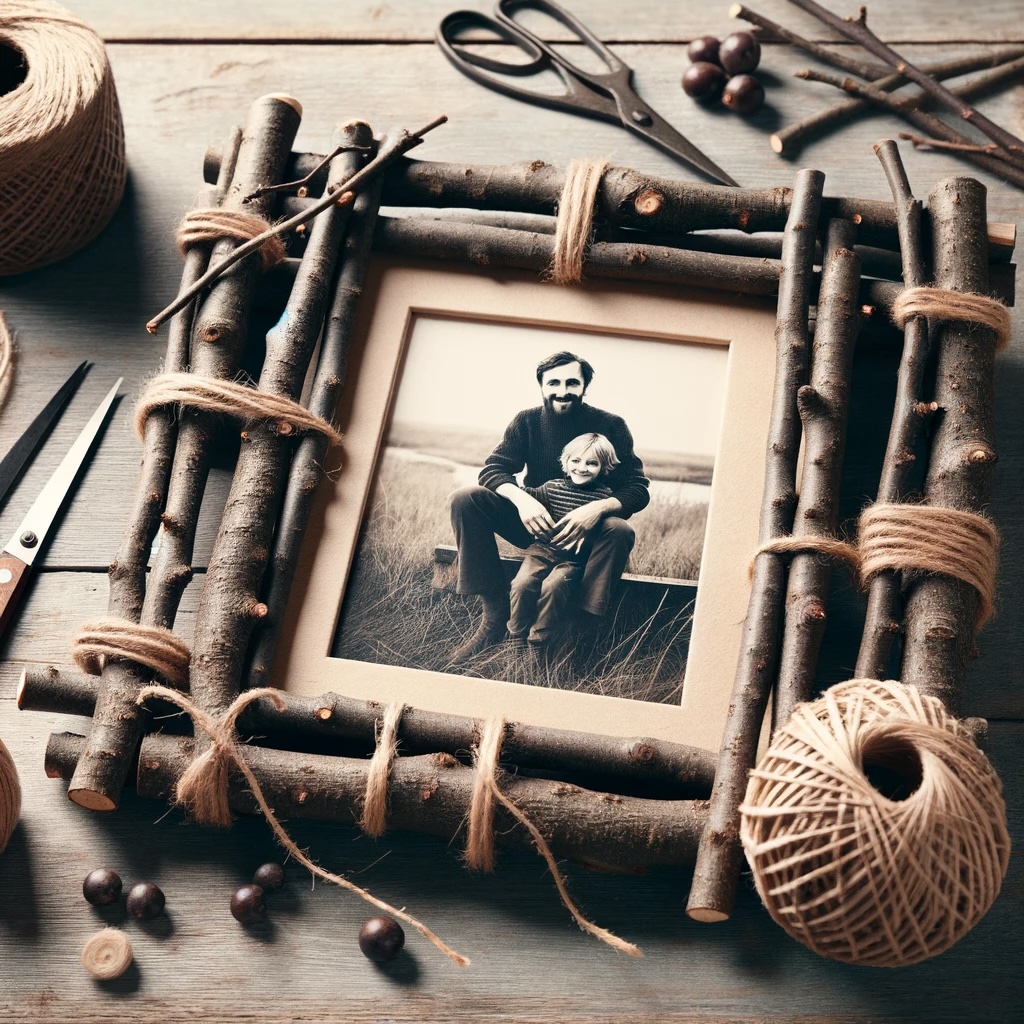
What You’ll Need:
- Twigs of various lengths and thicknesses
- A strong glue or a hot glue gun
- Cardboard or an old picture frame
- Scissors or garden shears
- Embellishments like string, buttons, or beads (optional)
Steps to Create Your Twig Frame:
- Twig Gathering: Take a walk with your kids and gather twigs. Look for ones that are relatively straight and easy to cut.
- Frame Base: If you’re using cardboard, cut it to your desired frame size. Alternatively, you can glue the twigs directly onto an old frame.
- Measure and Cut: Lay out your twigs around the frame base and cut them to the correct size.
- Assembling the Frame: Start gluing the twigs around the frame base. You can create different patterns or designs depending on the twigs’ sizes and shapes.
- Decorate: Once the basic frame is ready, let your kids decorate it. They can wrap it with string, glue on buttons, or attach beads for added charm.
This twig frame can be a beautiful way to display a family photo or a child’s artwork. It’s a constant reminder of the fun time spent crafting together and the beauty of nature.
Flower Petal Collage
A flower petal collage is a beautiful way to bring colors and textures of nature into your home. This activity not only allows children to explore their artistic side but also teaches them about different flowers and plants. It’s a delightful way to preserve the beauty of nature in a piece of art.
What You’ll Need:
- Flower petals and leaves of various colors and sizes
- A large sheet of paper or canvas
- Glue (PVA or a similar clear-drying glue)
- A picture frame (optional)
Steps to Create Your Flower Petal Collage:
- Collecting Petals and Leaves: Go on a nature walk and collect various petals and leaves. Remember to only pick fallen flowers or leaves.
- Design Your Layout: Before gluing anything down, experiment with different layouts on your paper or canvas. Encourage your children to think about color combinations and shapes.
- Gluing Down: Once you’re happy with the layout, start gluing the petals and leaves. Apply glue carefully to avoid damaging them.
- Pressing and Drying: After the collage is complete, you might press it gently under a book to ensure everything adheres flatly to the surface. Allow it to dry completely.
- Framing Your Artwork: Once dry, you can frame your collage. This step is optional but it helps preserve the artwork and makes for a wonderful display.
Creating a flower petal collage can be a serene and artistic activity, perfect for a quiet afternoon. It’s a wonderful way to capture the ephemeral beauty of flowers and leaves in a form that lasts.
Conclusion
Through these nature-inspired crafts, we hope you find joy in bringing a piece of the outdoors into your home. These activities are not just about creating art; they are about spending quality time with your children, exploring the natural world, and fostering a deeper appreciation for its beauty. So, gather your materials, let your creativity bloom, and enjoy these moments of crafting and learning with your little ones.